- Published on
AWS Lambda Serverless for Apache APISIX


In recent years, everything is moving into the cloud. With the emergence of microservice architecture, we have a proliferation of services - some of them are highly used while some are very infrequent leading rise to resource under-utilization and the birth of serverless.
Apache APISIX provides support for serverless frameworks for popular cloud vendors (AWS, Azure). Instead of hardcoding the function URL into the application, APISIX suggests defining a route with the serverless plugin enabled. It gives the developers the flexibility to hot update the function URI along with completely changing the faas vendor to a different cloud provider with zero hassle. Also, this approach mitigates authorization and authentication concerns from application logic as APISIX has very strong authentication support that could be used to identify and authorize client consumers to access the particular route with the faas. This article talks about the recent addition of a new plugin aws-lambda, and gives detailed instructions on how to integrate AWS Lambda, which is a widely used serverless solution, into the Apache APISIX serverless suite.
TLDR; if you are only interested in integrating AWS Faas with Apache APISIX head over to how-to-use
Contents Summary
- Contents Summary
- Introducing Apache APISIX
- Demystifying Serverless - What is it?
- About aws-lambda Plugin
- How to Use
- Custom Configuration
- Related pull request
Introducing Apache APISIX
Apache APISIX is a dynamic, real-time, high-performance API gateway that provides load balancing, dynamic upstream, canary release, fine-grained routing, rate limiting, service degradation, circuit breaking, authentication, observability, and hundreds of other features. In addition, the gateway supports dynamic plugin changes along with hot-loading. Apache APISIX can be used to proxy traditional NORTH-SOUTH traffic, as well as EAST-WEST traffic between services, or as a k8s ingress controller.
Demystifying Serverless - What is it?
Serverless is a cloud computing execution model where the cloud vendor runs the server by dynamically managing the allocation and deallocation of hardware resources so that the end-users can just focus on the main business logic aka the actual code that is going to be executed. Here, the logic runs as a function and there are two important traits of these functions - they are stateless, i.e. function instances are created and destroyed on demand so there should not be any in-memory states and they are event-driven that means the piece of code aka functions get executed via a triggering signal. These triggers could be HTTP requests, file upload to blob storage or the addition of new rows on cloud-SQL. So the benefits are:
- Easy deployment: The serverless framework needs no manual provisioning of the VM or computes instances as everything has been abstracted into functions and the cloud provider manages the infrastructure.
- Highly Scalable and Cost-Effective: The function application is automatically scaled up or down depending on the network traffic or load. So this is a cost-effective solution that leads to a shift from VM to serverless for the services which are less frequently invoked. But there is no such thing as free lunch. If the application gets bombarded by multiple clients, deploying a compute instance VM might be a cheaper alternative.
About aws-lambda Plugin
The aws-lambda plugin lets the users define an upstream to the AWS Lambda serverless function for an APISIX gateway URI. If enabled, this plugin terminates the ongoing request to that particular URI and initiates a new request to the AWS lambda API gateway (the new upstream) on behalf of the client with the suitable authorization details set from the plugin schema, request headers, request body, params ( all these three components are passed from the original request ) and returns the response body, status code and the headers back to the original client that has invoked the request to the APISIX agent.
The plugin supports authorization to AWS lambda faas service via API keys and AWS IAM secrets.
Steps to Run Lambda FAAS on AWS Cloud
The primary goal of the plugin is to proxy the gateway route specified in the route configuration to the AWS Lambda api gateway URI. This section gives you a hands-on how to configure and create a lambda function and the respective triggers via different authorization techniques to access the endpoint.
-
First sign up/in to AWS Console and sets up a free tier plan. AWS Lambda functions are forever free up to 1 million invocations per month. To know more about the pricing, visit here.
-
Visit the Lambda Console for the AWS region of your choice click on
Create functionbutton (see fig below). -
Visit the function homepage and navigate to the Code tile to deploy the code that is going to be executed each time lambda has been invoked:

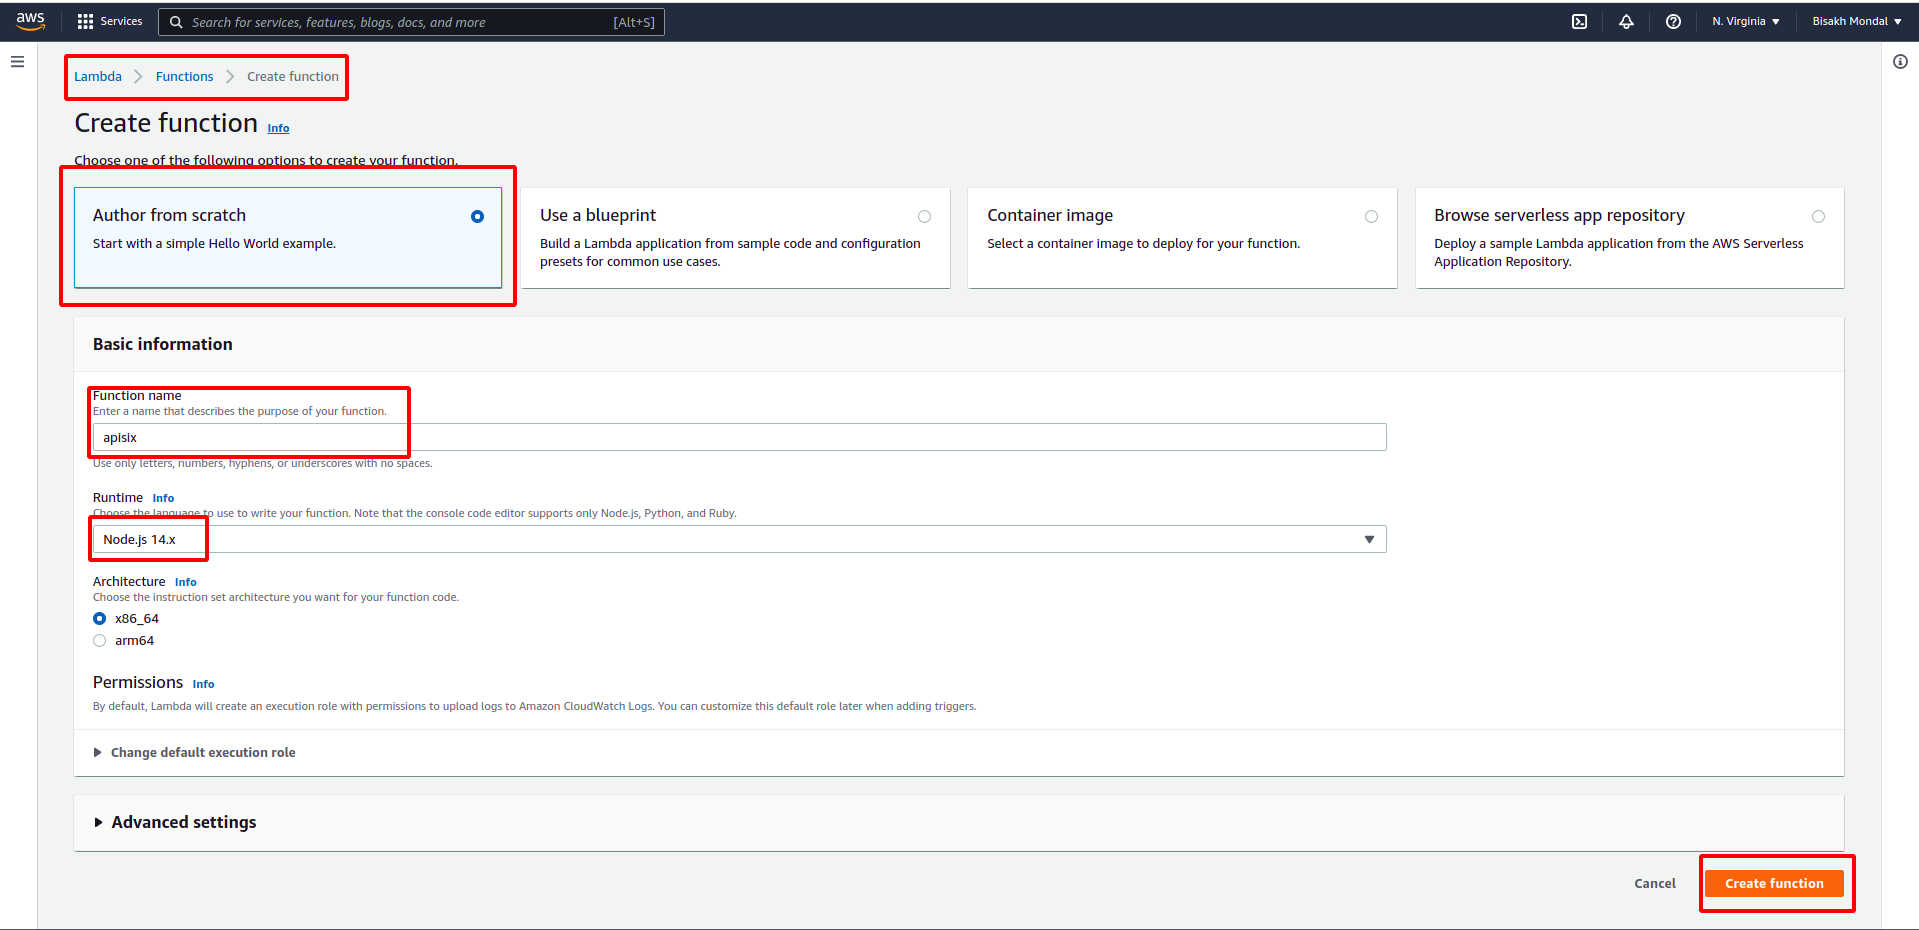

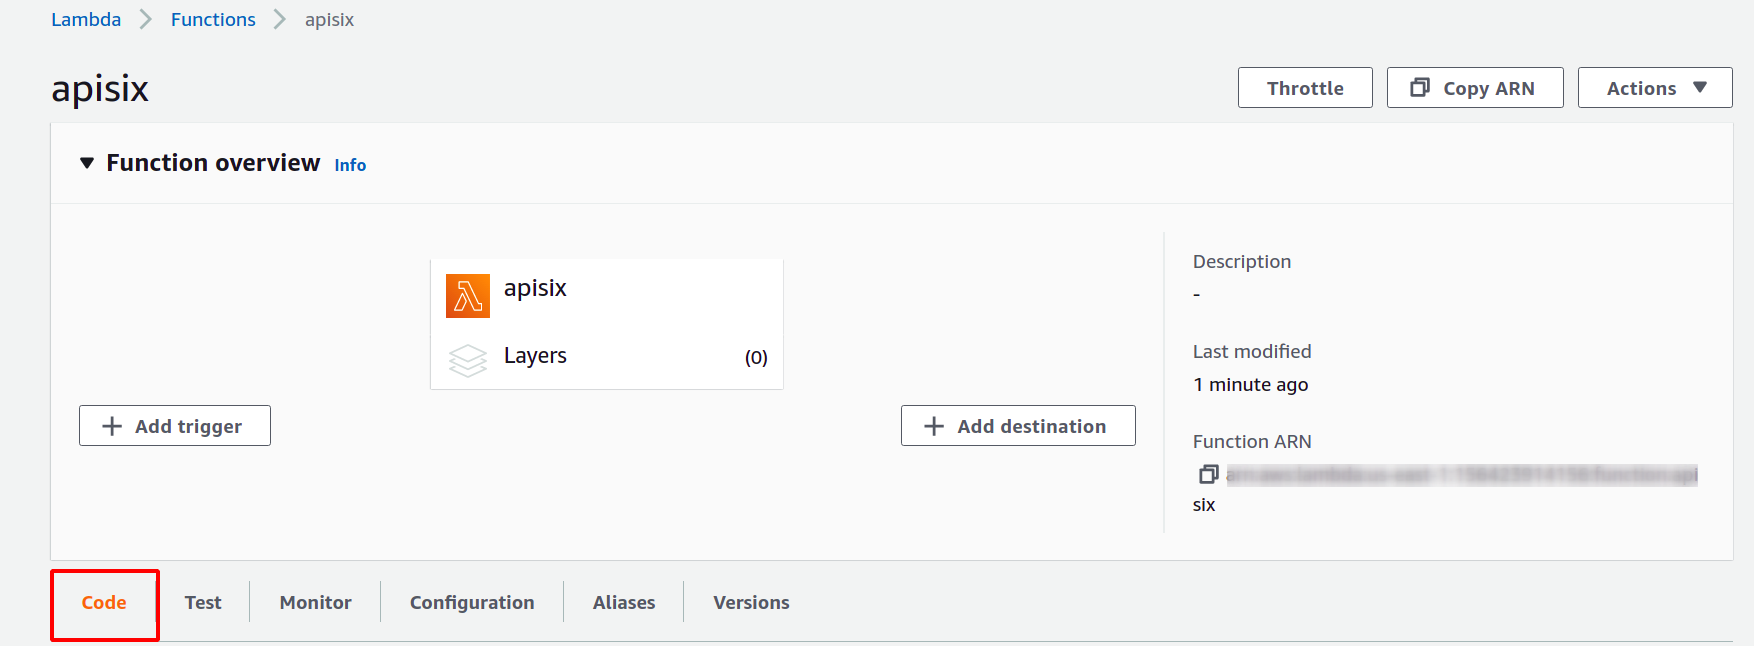
- Deploy the following snippet to the same function app that we just created:
exports.handler = async (event) => {  let name = event['queryStringParameters'] ? event['queryStringParameters']['name'] : undefined
  // Check if there is any entry inside the request body  if (!name && event.body !== null && event.body !== undefined) {    let body = JSON.parse(event.body)    if (body.name) name = body.name  }
  const response = {    statusCode: 200,    body: JSON.stringify(`Hello, ${name}!`),  }  return response}
- this snippet takes the name from query parameters (if present, else from the request body) and greets the user.
How to Use
The following is an example of how to enable the aws-lambda plugin for a specific route. We are assuming your AWS API gateway HTTP trigger is up and running.
The plugin is capable of handling authorization via api keys and AWS IAM access secrets.
Plugin with Authorization via API-KEY
If the authorization schema of the aws-lambda APISIX plugin is set with a string value, the plugin by default uses it, as the process is less resource-intensive compared to authorization via IAM access keys through aws v4 request signing.
# enable plugin for a specific routecurl http://127.0.0.1:9080/apisix/admin/routes/1 -H 'X-API-KEY: edd1c9f034335f136f87ad84b625c8f1' -X PUT -d '{ "plugins": { "aws-lambda": { "function_uri": "https://x9w6z07gb9.execute-api.us-east-1.amazonaws.com/default/test-apisix", "authorization": { "apikey": "<Generated API key to access the Lambda function>" }, "ssl_verify": false } }, "uri": "/aws"}'Now any requests (HTTP/1.1, HTTPS, HTTP2) to URI /aws on the APISIX gateway will trigger an HTTP invocation to the aforesaid function URI and response body along with the response headers and response code will be proxied back to the client. For example ( here lambda execution environment just take the name from query param of the request event and returns Hello $name ) :
$ curl -i -XGET localhost:9080/aws\?name=APISIXHTTP/1.1 200 OKContent-Type: application/jsonConnection: keep-aliveDate: Sat, 29 Nov 2021 16:08:27 GMTx-amz-apigw-id: JdwXuEVxIAMFtKw=x-amzn-RequestId: 471289ab-d3b7-4819-9e1a-cb59cac611e0Content-Length: 16X-Amzn-Trace-Id: Root=1-61a22dca-600c552d1c05fec747fd6db0;Sampled=0Server: APISIX/2.10.2
"Hello, APISIX!"
Considering, APISIX is also running with enable_http2: true on APISIX config-default.yaml for port 9081 (say), any HTTP/2 communication between client and APISIX agent will be proxied to the lambda faas similar to HTTP/1.1 and responses will be proxied back to the client with proper headers. For example:
$ curl -i -XGET --http2 --http2-prior-knowledge localhost:9081/aws\?name=APISIXHTTP/2 200content-type: application/jsoncontent-length: 16x-amz-apigw-id: JdwulHHrIAMFoFg=date: Sat, 29 Nov 2021 16:10:53 GMTx-amzn-trace-id: Root=1-61a22e5d-342eb64077dc9877644860dd;Sampled=0x-amzn-requestid: a2c2b799-ecc6-44ec-b586-38c0e3b11fe4server: APISIX/2.10.2
"Hello, APISIX!"
Plugin with Authorization via AWS IAM Access Secrets
aws-lambda plugin also supports the authorization of the lambda resources via AWS IAM access keys. This requires an IAM access key which is generated from the AWS web console or any third-party plugin that can generate access keys on behalf of the AWS root user (of course through another IAM). To create an APISIX route with the IAM authorization, see the example:
# enable aws lambda for a route via iam authorizationcurl http://127.0.0.1:9080/apisix/admin/routes/1 -H 'X-API-KEY: edd1c9f034335f136f87ad84b625c8f1' -X PUT -d '{ "plugins": { "aws-lambda": { "function_uri": "https://ajycz5e0v9.execute-api.us-east-1.amazonaws.com/default/test-apisix", "authorization": { "iam": { "accesskey": "<access key>", "secretkey": "<access key secret>" } }, "ssl_verify": false } }, "uri": "/aws"}'Upon receiving any request to the /aws endpoint the plugin performs AWS V4 request signing (see more) with the IAM access key and add the unique hexadecimally encoded signature to the proxy request Authorization header with a predetermined format as per AWS documentation. On the AWS side, the AWS API gateway recomputes the same SHA-256 hash with the HMAC algorithm and verifies the identity of the request and provides the intended authorization.
If you are a beginner and want to try how to achieve the whole thing, follow the guidance described below:
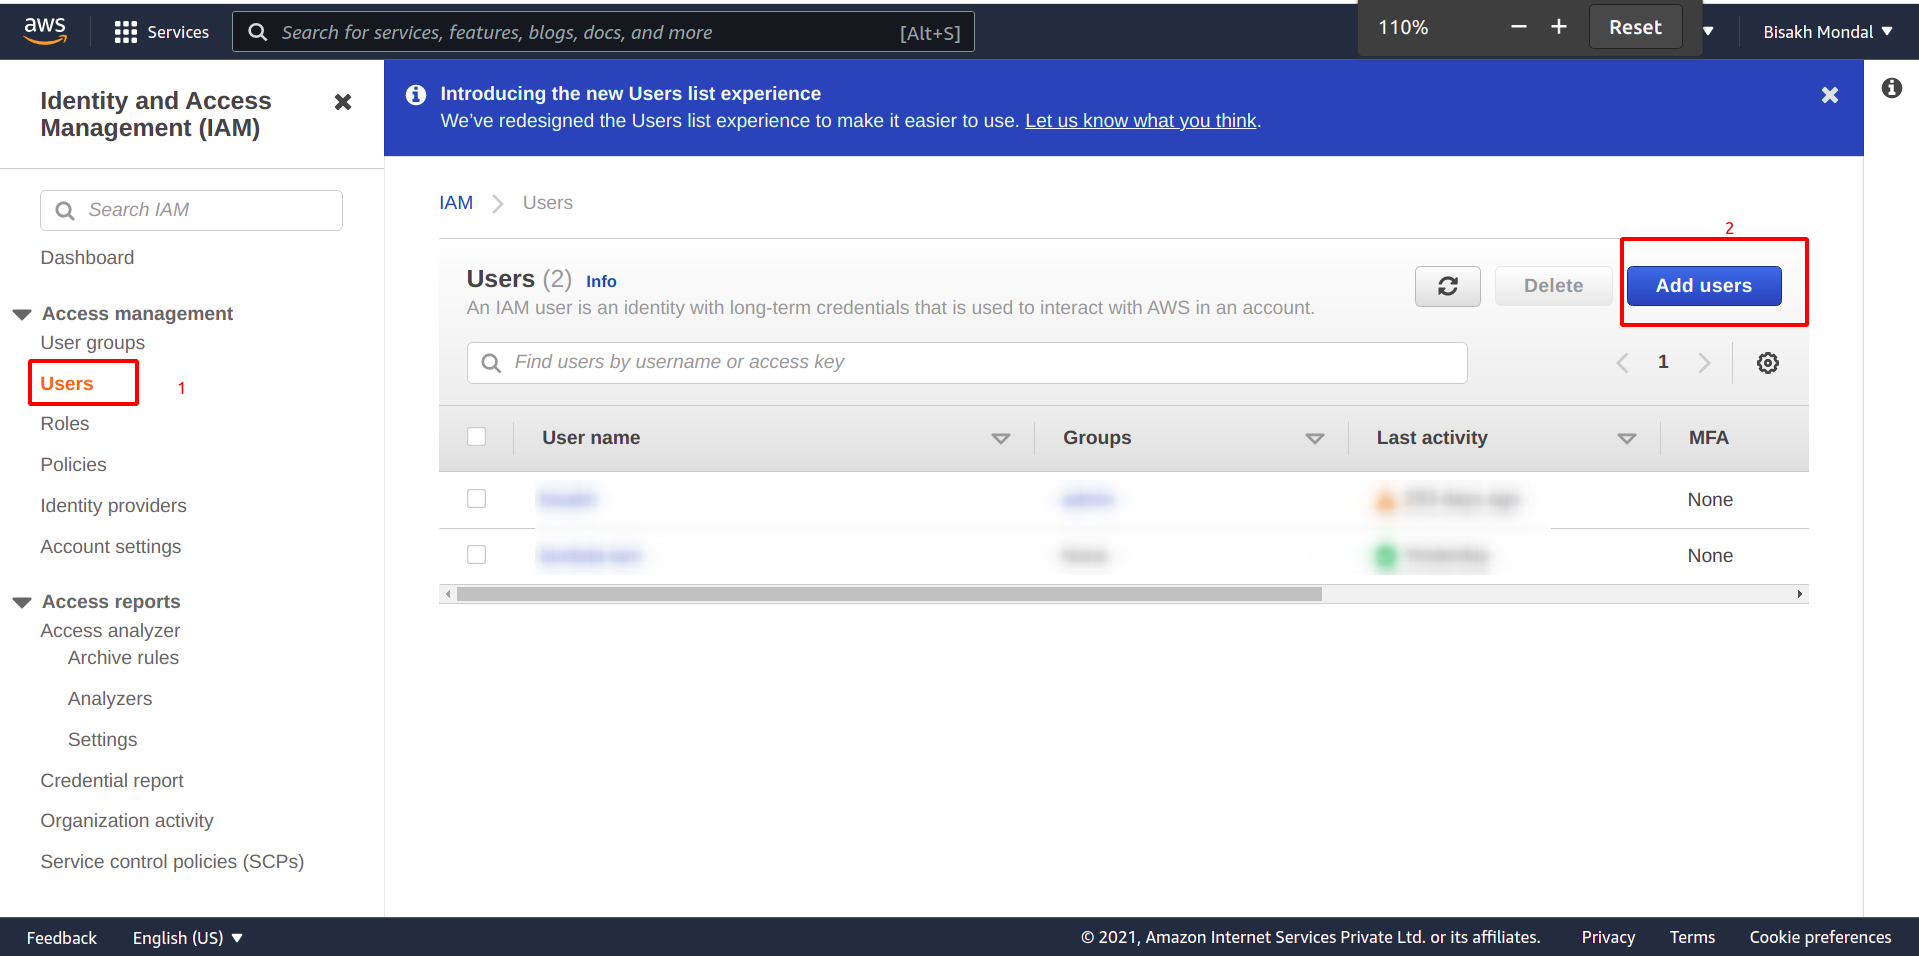
-
Head over to the AWS IAM Console and click on Add users:
-
Next when prompted to a form give this IAM key a suitable name and give tick on
Access key - Programmatic access -
On the permissions window give the IAM user access to the
AmazonAPIGatewayInvokeFullAccesspolicy. You may also choose to provide any lower-level access privileges.


That's it. You may now copy the Access key ID and Secret access key from the web console and pass them to the APISIX route schema.
Disabling Plugin
Now, to disable the plugin simply remove the corresponding JSON configuration in the plugin configuration to disable the aws-lambda plugin and add the suitable upstream configuration.
APISIX plugins are hot-reloaded, therefore is no need to restart APISIX.
$ curl http://127.0.0.1:9080/apisix/admin/routes/1 -H 'X-API-KEY: edd1c9f034335f136f87ad84b625c8f1' -X PUT -d '{ "uri": "/aws", "plugins": {}, "upstream": { "type": "roundrobin", "nodes": { "127.0.0.1:1980": 1 } }}'Custom Configuration
In a minimal configuration while creating a new route with the aws-lambda plugin enabled, function_uri is the mandatory attribute of the plugin config that points to the function URL. There is a lot of additional options that can be tweaked with plugin schema:
Plugin Schema
| Name | Type | Requirement | Default | Valid | Description |
|---|---|---|---|---|---|
| function_uri | string | required | The AWS api gateway endpoint which triggers the lambda serverless function code. | ||
| authorization | object | optional | Authorization credentials to access the cloud function. | ||
| authorization.apikey | string | optional | Field inside authorization. The generate API Key to authorize requests to that endpoint of the AWS gateway. | ||
| authorization.iam | object | optional | Field inside authorization. AWS IAM role based authorization, performed via AWS v4 request signing. See schema details below (here). | ||
| timeout | integer | optional | 3000 | [100,...] | Proxy request timeout in milliseconds. |
| ssl_verify | boolean | optional | true | true/false | If enabled performs SSL verification of the server. |
| keepalive | boolean | optional | true | true/false | To reuse the same proxy connection in near future. Set to false to disable keepalives and immediately close the connection. |
| keepalive_pool | integer | optional | 5 | [1,...] | The maximum number of connections in the pool. |
| keepalive_timeout | integer | optional | 60000 | [1000,...] | The maximal idle timeout (ms). |
IAM Authorization Schema
| Name | Type | Requirement | Default | Valid | Description |
|---|---|---|---|---|---|
| accesskey | string | required | Generated access key ID from AWS IAM console. | ||
| secret_key | string | required | Generated access key secret from AWS IAM console. | ||
| aws_region | string | optional | "us-east-1" | The AWS region where the request is being sent. | |
| service | string | optional | "execute-api" | The service that is receiving the request (In the case of HTTP Trigger it is "execute-api"). |
This gives a whole lot of flexibility to tightly bind the behaviour of the AWS lambda faas - from configuring the timeout to the keepalive pool and validating the SSL certificate of the serverless faas. To be honest, this actually means a lot when it comes to serverless as the services are event-driven and resources are being allocated by the cloud provider on the fly.
>> What is AWS Signature V4 ?
If you are using APISIX aws-lambda plugin, internally it performs request signing via AWS Signature V4 to authorize requests via AWS API Gateway, an endpoint that triggers your lambda code. This section describes how this is done from the APISIX side.
The signing process helps secure requests in multiple ways:
- It verifies the identity of the requesting user. Acts as an authentication alternative as you know which IAM key has been used to sign the request.
- Protecting data over the wire. The generated signature is produced from a complex process wherein one step the string which needs to be signed contains the request body data. Then an HMAC has been performed with the SHA-256 algorithm to generate the signature digest.
- It helps protect against replay attacks. The request contains an extra header
X-Amz-Datewhich contains the date stamp when the request has been signed. So to prevent from replay attacks, aws just allows requests which have been signed within five minutes (in most cases).
Request Signing Algorithm
This whole request signing is done in four steps:
-
First by creating a canonical request - simply put it's a request with the standardized format. a. Canonical URI - the part of the URI from domain to query string (
/if no path is present). b. Canonical QueryString - URL encoded query string sorted by key names. c. Canonical Headers - trimmed and sorted headers in lowercase with a trailing newline (\n). d. Signed Headers - the list of headers in the Canonical Headers in sorted order and delimited by;. -
Use the canonical request and additional metadata to create a string for signing. a. The signing key is computed via
var string_to_sign = "AWS4-HMAC-SHA256" + "\n" + timestamp +"\n" + datestamp + "/" + #aws region name + "/"#aws service + "/aws4_request" ++ "\n" + sha256(# canonical request from step 1) -
Derive a signing key from your AWS secret access key. Then use the signing key, and the string from the previous step, to create a signature. The algorithm is listed below:
string GetSignatureKey(key, datestamp, region, service string){kDate := hmac256("AWS4" + key, datestamp)kRegion := hmac256(kDate, region)kService := hmac256(kRegion, service)kSigning := hmac256(kService, "aws4_request")return kSigning} -
Add the resulting signature to the HTTP request in a header (
Authorization) or as a query string parameter.
For more details visit here
Related pull request
✅ PR#5594 feat(plugins): aws lambda serverless
Thank You!
––– views